become a contributor


MAKE IT CUTE
DIYs
Pretty up your pencils with these back to school DIYS

Pencils are a school supplies staple. But, their plain yellow look can get pretty boring after a while. Liven up your writing utensils this year with these 3 creative and colorful pencil projects.

Washi Tape Pencils
What you'll need:
Pencils
Washi tape in your fave designs
Directions:
1. Wrap the washi tape around your pencil to cover the whole stick.
2. Snip off any excess tape.
3. Repeat these steps on all of your pencils.
P.S. You can change your pencil designs any time you want by removing the washi tape and replacing it with another style.
Tutorial: sheknows

Painted Pencils With Words
What you'll need:
Multi-surface acrylic craft paint in the colors you love
Pencils
Paintbrush with a straight end
Fine point Sharpie marker
Directions:
1. Lean your pencils on top of something higher than the surface they are on.
2. Paint the pencils. To help prevent paint from getting on the top of the pencils, consider wrapping the tops in washi tape and removing the tape once you are done painting.
3. Give the pencils time to dry. Make sure they are not lying down on the table.
4. If you want, do a second paint coat and allow time to for the pencils to dry again, about 4 hours.
5. Use a regular pencil to write words on the painted pencils. Choose any cute, funny or motivational phrases you would like your pencils to say or even simply label them with your name.
6. Outline over the written words with the Sharpie pen to make the words boldly stand out on the pencils.
Tutorial: hello glow

Glitter Pencils
What you'll need:
Glitter
Pencils
Mod Podge
Paintbrush
Directions:
1. Use your paintbrush to coat the top of the pencils, right below the erasers, with Mod Podge.
2. Pour the glitter into a small bowl.
3. Dip the top of the pencil covered in Mod Podge into the bowl of glitter and roll it around to completely cover the glue.
4. Repeat the first 3 steps on all of the pencils.
5. Allow the glitter time to dry on the pencils. Now, write away with your sparkly new school supplies.
Tutorial: brunchatsaks
Are you excited to try any of these pencil DIYs? How do you decorate your school supplies? Let us know in the comments!
POSTED IN School, crafts, diy, MAKE IT CUTE, DIYs, back to school, have the best school year ever, DIY school supplies


POLL
The best Saturdays start with a trip to the bakery. The superior pastry & drink combo is:

LOVE THIS
Your spring style guide
just dropped...🌷
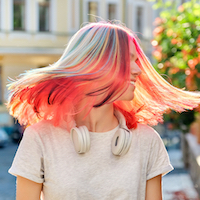
Spring is absolutely, well, springing...and it’s time for your style to follow suit. Fun In by Sun In temporary hair dye + bold kicks from Skechers = the cheat code for a head-to-toe serve. Find alll the inspo here.
FREE STUFF
CALDER ACADEMY IS A TOTAL NIGHTMARE
The scariest school on Earth is about to experience real fear. A hurricane unleashes secret horrors at an academy for rogue paranormals in this gripping spinoff of the bestselling Crave series. Enter to win here!