become a contributor


MAKE IT CUTE
DIYs
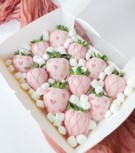
This cute DIY is the *perfect* Valentine’s gift for your crush
Are you freaking out because you don't know what to get your crush this Valentine's Day? Well, if they have a sweet tooth, they will absolutely love this handmade Pinterest-inspired present from you. It only takes about 15 minutes to create, and you can customize it with *all* of your crush's favorite sweets. Check out Fun Squared for an easy step-by-step tutorial on this fun project with everything you need to know to get your DIY on:
Step 1: Gather Your Supplies
- 2 hatboxes or other round boxes, in different sizes (you can find them at the craft supply store!)
- LOTS of candy: Full-sized airheads for the upper layer, 8-10 boxes of candy for the bottom layer, lollipops, and small "filler" candy pieces like Jolly Ranchers, Tootie Rolls or Starbursts.
- Hot Glue
- Floral Foam cut into a circle (you can also find this at the craft store: it needs to be small enough to fit inside the smaller hatbox!)
- Ribbon (optional)
Step 2: Prepare Hatboxes
Take the lids off of your hatboxes (you won't use them at all) and flip the larger box upside down so that it is ready for the candy.
Step 3: Form Bottom Layer
Start using your hot glue to attach the candy boxes all around the side of the larger hatbox. This will be the bottom layer of your cake.
Step 4: Form Top Layer
Keep the smaller hatbox right side up and start gluing Air Heads around the side in the same way that you did with the bottom layer. You can do any color pattern you want, or keep it classic by adding the candy in rainbow order.
Step 5: Connect The Two Layers
Place the top layer on top of the turned-over bottom layer. You might want to glue them together to ensure they stay in place, but you don't have to.
Step 6: Decorate The Top
Place the floral foam piece inside the upper layer of your cake, and then stick your lollipops into the foam so that the tops stick out and look like a real cake topper. Finally, add your filler candy in the empty space inside your top layer until it looks complete.
Step 7: Finish It Off!
If you want to use ribbon as decor, simply use your hot glue to attach a strand of it across the middle of both layers. Now you are ready to give the cake to your valentine!

Are you going to try this *adorable* DIY present? Let us know and tag us in pics of your creations @girlslifemag on all social medial platforms!
POSTED IN DIYs, valentine's day, V-Day gifts, inexpensive gifts


POLL
Imagine there was a rom-com bestseller about you and your crush. Which trope would be front and center?

LOVE THIS
Your spring style guide
just dropped...🌷
Spring is absolutely, well, springing...and it’s time for your style to follow suit. Fun In by Sun In temporary hair dye + bold kicks from Skechers = the cheat code for a head-to-toe serve. Find alll the inspo here.
FREE STUFF
FOR FANS OF FOUND FAMILY

Lucy’s life is forever changed when she loses her father at sea and is sent to live with a family of lighthouse-keepers. All she wants is to survive the choppy waters and find the legendary treasure her dad was searching for. Enter to win here!