become a contributor


MAKE IT CUTE
Fashion
Let it glow: DIY gifts to make your friends and fam
[gallery]
 VIEW THUMBNAILS


-

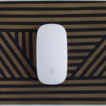
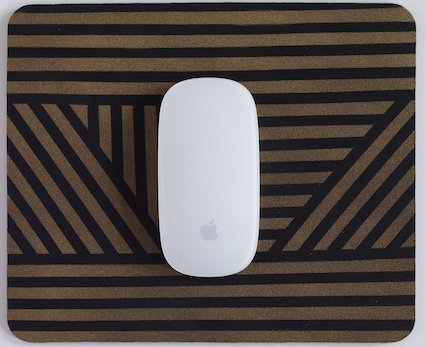
Glitzy mousepad
Painter’s tape and spray paint are all you need to craft this cool computer must-have. Perfect for Mom’s desk.
Materials:
- Black mousepad (find one on amazon.com)
- ¼-inch vinyl tape (also at amazon.com)
- Ruler
- Gold spray paint
- Foam pouncer
- Mod Podge
What you’ll do:
1. Use the tape to make a striped pattern on your mousepad. A ruler helps to keep things lined up and equally spaced. Try a combination of diagonal, vertical and horizontal lines for a cool pattern.
2. Press down on all pieces of tape so they are fully attached to the mousepad surface. Outside or in a garage, spray paint the mousepad with the gold spraypaint. Let dry.
3. Remove the tape once paint is dry. Using the foam pouncer, apply Mod Podge over the entire surface of the mousepad. Let dry.
-

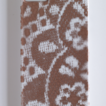
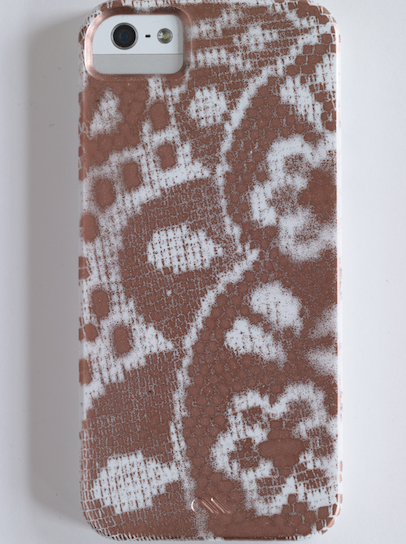
Lacy phone case
Make a matching case in a different color for your BFF, fave cousin or little sis. Add stick-on rhinestones if you want to go extra glam.
Materials:
- Cellphone case
- Foamboard
- Section of lace fabric (large enough to cover the phone case)
- Straight pins
- Copper spray paint
What you’ll do:
1. Lay the empty phone case on top of the foam core, with the front side down.
2. Place the section of lace over top of the phone case. Use straight pins to tack it into the foam core, stretching to pull it flat and tight. You don’t want it to budge!
3. Outside or in a garage, spray paint the lace-covered case on top of the foam core. Let dry.
4. Wait until the paint is completely dry (at least 30 minutes), then remove the lace.
-

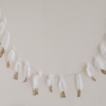
Feather garland
Deck the lockers of your crew with these glittery garlands.
Materials:
- Feathers
- Wax paper
- Glue stick
- Glitter
- 6’ Twine
- Washi Tape
What you’ll do:
1. Lay out the feathers on top of the wax paper.
2. Rub the top of the feather (about a 1” section) with the glue stick.
3. Sprinkle glitter over the glue section and let dry. Repeat for 12-18 feathers, depending on the length of your garland.
4. Tie the feathers onto the twine by wrapping the twine around the quill of the feather.
5. Use Washi tape to hang your garland on the wall or in a locker.
-

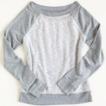
Stitched sweatshirt
Whip up this embroidered masterpiece while you watch your fave holiday flick.
Materials:
- Sweatshirt
- Embroidery needle
- Embroidery floss in 3-4 colors
- Scissors
What you’ll do:
1. Choose one of the colors of embroidery floss and thread the needle. Knot the end and make your first stitch just below the collar of the sweatshirt.
2. Begin to make tiny X stitches in a row, following the line of the collar. When you reach the end, tie off the thread and trim.
3. Thread the needle with a new color of floss, and begin to sew a different stitch in a line below the first. Try horizontal dashes, vertical lines, slashes or parallel lines.
4. Repeat steps 2-3 until you’ve stitched the desired amount. -

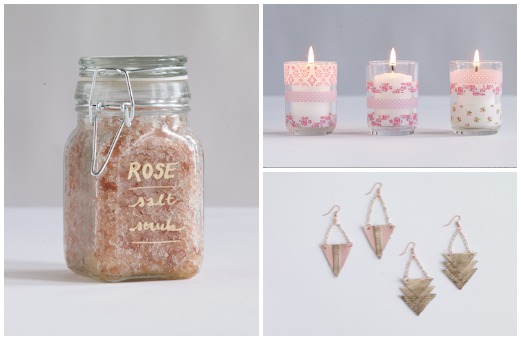
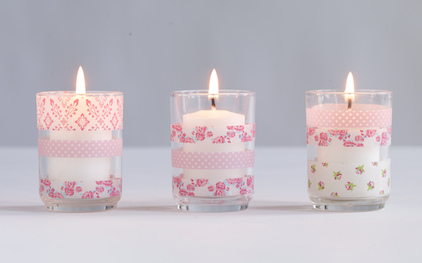
Washi tape candles
Dollar-store votives never looked so chic. Customize them to match every one of your friends’ rooms.
Materials:
- 3 Small glass votive candle holders
- 3 Small votive candles
- Washi tape in a variety of 3-4 colors
- Scissors
What you’ll do:
1. Measure a piece of tape to fit around the circumference of the glass votive.
2. Trim tape where ends meet and affix to glass, making sure to keep the tape line straight.
3. Repeat with another pattern/color of Washi tape 2-3 times so you have multiple rows of tape.
4. Insert a candle and get glowing.
-

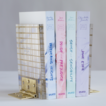
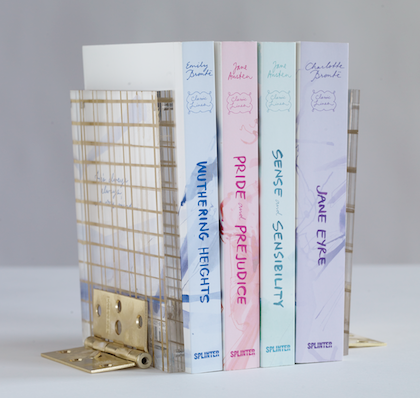
Gold-lined bookends
Your teacher will heart these chic bookends made out of door hinges.
Materials:
- 5X7” 2-piece acrylic magnetic frame (find on amazon.com)
- Super glue
- 2 gold door hinges (find at a home store)
- Gold leaf paint pen
- Ruler
What you’ll do:
1. Separate the acrylic frame into two pieces. Using the ruler and gold leaf pen, begin to draw straight lines on one side of one frame in even intervals.
2. Repeat step 1 on the other acrylic frame.
3. Once the first acrylic piece has dried, draw even perpendicular lines on the opposite side of the frame, so they seem to intersect. Let dry.
4. Repeat step 3 on the other acrylic frame.
5. Add more lines on either side of the first frame, making a plaid design.
6. Repeat step 5 on the other acrylic frame.
7. Use the super glue to attach one hinge to the bottom of one frame (frame should stand vertically).
8. Follow the glue directions to get a good seal.
9. Attach the second hinge to the second frame bottom.
10. Let dry, then place on your shelves.
-

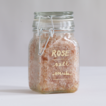
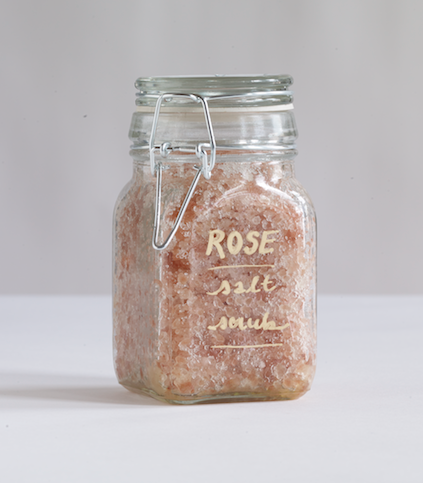
Rose salt scrub
A sweet-smelling scrub brings you back to summer with just one sniff. Four easy ingredients and you’ve got a spa day on your hands.
Materials:
- Small mixing bowl
- Wooden spoon
- 1 ¼ cup coarse sea salt (pink himalayan salt)
6 T fine sea salt - 3 T jojoba oil
- 6 drops rose essential oil
- 7 oz. glass jar / bottle
- Gold leaf pen for writing on bottle
What you’ll do:
1. Mix both salts and the oil together in a small mixing bowl with a wooden spoon until combined.
2. Add the rose essential oil and give everything another stir.
3. Fill the glass jar with the salt scrub and close the lid.
4. Use the gold leaf pen to write “Rose Salt Scrub” on the front.
-

Leather earrings
Luxe layers of metallic leather look edgy-cool with copper chain. Stick with simple geo shapes and impress everyone.
Materials:
4” square pink leather (try amazon.com)
4” square gold leather (try amazon.com)
Scissors
Super glue
Leather hole punch (found at ebay.com)
Pliers
Copper chain
Copper jump hoops
Copper earring hooks
What you’ll do:
1. Cut 3 equal triangles out of the gold leather.
2. Layer them on top of one another, then add a dab of glue to the back of each point to hold them in place.
3. Use the smallest setting on your leather hole punch to make two holes in the longest side of the top triangle.
4. Cut 2 lengths of chain about 1” long with the pliers. Use the pliers to add a jump ring to one end on each chain.
5. Connect the chains with one jump ring, then use the pliers to slide that jump ring with the two chain ends onto the end of an earring hook.
6. Repeat steps 1-5 for the second earring.
7. To make the pink leather earring, cut two large triangles out of the pink leather, and two small strips of gold leather.
8. Glue together and trim the ends to come to one point.
9. Repeat steps 3-5.
-

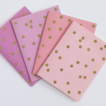
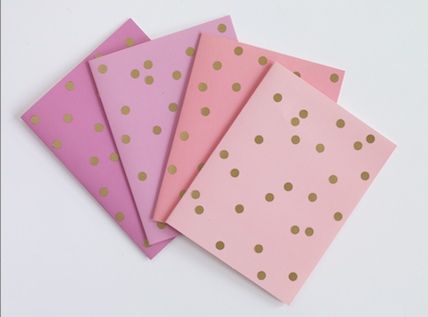
Confetti cards
What girl doesn’t love custom stationery? Get creative with gold vinyl paper and a handy hole punch.
Materials:
- Folded cardstock cards and matching envelopes (find a cheap set at amazon.com)
- Hole punch
- Silhouette America Premium Gold Adhesive Vinyl Paper (find on amazon.com)
What you’ll do:
1. Use the hole punch to cut out lots of small circles from the gold vinyl paper.
2. Peel off the backing from the holes and affix to the front of a cardstock card.
3. Space them out evenly or randomly, spell out your friend’s name or make a pretty design—it’s up to you!


POSTED IN diy, card, christmas crafts, diy gifts, Dec/Jan 2014


POLL
The best Saturdays start with a trip to the bakery. The superior pastry & drink combo is:

LOVE THIS
All your period probs, solved 💕

So maybe your monthly flow isn’t, um, go with the flow. Never fear! Take our quiz to pair up with your perfect Pamprin and end the menstrual madness.
FREE STUFF
PLOT YOUR OWN LIFE STORY
Turning the page means turning back the clock when Dally uncovers an ancient vault where each book is a portal to a precise moment in time. “Checking out” adventure after adventure is fun…until she’s faced with the secrets of her family’s history. Enter to win here!