become a contributor


MAKE IT CUTE
Recipes
Homemade peanut butter cups

To make these delightful bites, you can use whatever combination of chocolate and peanut butter (or other filling, like marshmallow fluff) you prefer. I used two cups of semi-sweet chocolate chips plus 6 oz of unsweetened chocolate.
2 ½ cups of chocolate (that’s a bag and a half of chocolate chips or 18 oz of bar chocolate)
1 cup peanut butter (I used an all-natural peanut butter I found in my local grocery store, but you can use whatever brand you like)
¼ cup crushed crackers (Graham crackers, rice crackers, even rice Chex cereal works just fine. Use whatever you have on hand.)
1. Put all of the chocolate into a heatproof bowl and set over a pot of boiling water. Stir occasionally as it melts.
These babies can totally be adjusted depending on your preference or allergies. To make them gluten free, double-check your peanut butter and chocolate choices and use rice crackers or rice cereal instead of graham crackers. Allergic to nuts? Use a different filling. Prefer white chocolate? Use that instead of milk or dark (but be forewarned: It is more difficult to melt smoothly).
POSTED IN sweet treats, chocolate, gluten-free recipes, vegan recipes, vegetarian recipes


POLL
Choose the best braided hairstyle:

LOVE THIS
Say hello to our 2024 Beauty Awards Winners 💄

We’re presenting our beauty MVPs of this year so your face card... and hair card...and mani card...never, ever declines again. Check out our must-haves HERE!
FREE STUFF
HUMOR, HEARTACHE, AND COMING-OF-AGE CHAOS
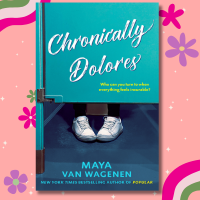
Fourteen-year-old Dolores is decidedly *not* thriving, with her ever-changing friendships, family drama and chronic medical condition. She devises a plan to make the most of the school year, but can she pull it off? Enter to win here!