become a contributor


MAKE IT CUTE
DIYs
Fun tie-dye masks to add some color to your quarantine
A returning trend that is on everyone's minds this summer is tie-dye! Why not spice up your quarantine masks and make *cute* tie-dye ones?
The way you make these masks is very simple and you only need a few materials to make them. First, you will need a plain white face mask and a tie-dye kit of your choice.
Add some flair to your mask by using multiple colors or just use one to create a one-of-a-kind lewk. Don't forget to add elastic string to your mask so you can make quarantine as fashionable as possible. Totally chic!
Step 1: Hit up your local art supply store or order on Amazon to search for supplies to make your tie-dye mask.
Step 2: Find a white cloth that measures large enough to cover the bottom half of your face. (Or, just order a plain white mask and skip to Step 6.)
Step 3: Find elastic string and an assortment of rainbow colors of your choosing! You will just need to add water to apply the colors to your cloth.
Step 4: Make sure you grab a handful of rubber bands so you can create some unique designs that are totally cute.
Step 5: Cut your mask into a shape that will fit around your mouth and nose.
Step 6: Twist your mask into a ball and tie rubber bands around the cloth in a funky pattern.
Step 7: Apply tie-dye colors to different sections of the cloth.
Step 8: Let your cloth sit for 6-8 hours so it can dry.
Step 9: Untie your cloth from the rubber bands and give your mask a wash to allow the colors to set in. Apply elastic string to the two sides of the mask through tiny cut holes.
Step 10: Voila! Your *amazing* tie-dye mask is ready to be seen!
There you have it! You will be stuntin' in your new tie-dye mask. Not only is a tie-dye mask a fun accessory to wear, but they are also so much fun to make during your free time. Get ready to slay in your new, colorful tie-dye face mask!


POLL
There's a maaajor thunderstorm outside, but you can be found:

LOVE THIS
🌸 QUIZ! Plan your perfect spring picnic 🌸

The flowers? Blooming. Your al fresco hangout? Totally ready to get plotted (inspired by our current read, The Second Favorite Daughter's Club: Sister Sabotage). Click HERE to take the quiz!
FREE STUFF
Win! Silk'n hair straightener
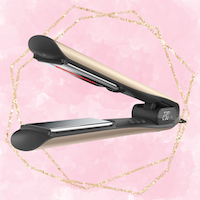
It's about to be the sleekest, shiniest spring yet—for your tresses, ofc. The SilkyStraight iron from Silk'n eliminates frizz and uses infrared technology—so the plates heat up ultra-fast (we're talking 15 seconds flat!). No more waiting around for your perfect hair day. Enter to win here!