become a contributor


MAKE IT CUTE
DIYs
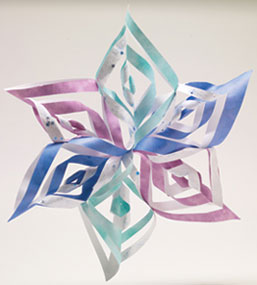
Deck the halls! 3D snowflakes
In our December/January 2010 issue, GL's editors spilled their favorite holiday crafts, recipes and DIY gifts.
This year, we're bringing them back, just in time for the holidays! Here's Meg's 3D paper snowflake craft, perfect for holiday parties.
Materials:
5 sheets of perfectly square paper
Scissors
Glue gun
Stapler
Instructions:
Fold paper to make a triangle. Fold the same triangle in half, so that
it makes a smaller triangle. Cut a horizontal slit at the side of the
triangle that doesn’t open. Make sure to leave about a centimeter of
space at the end. Cut as many more slits across (spaced an inch apart
from each other) that you can fit on the paper (should be about 5 or 6
cuts).
Unfold the triangle. Grab the two points in the center and fold
them in towards each other and staple. Then, grab the next 2 points and
fold them in towards each other the opposite way. Staple. Keep folding
and stapling all matching points together (remember to alternate front
and back). This is one arm of your snowflake. Repeat instructions to
make 5 more arms. Once all 6 arms are made, staple points together.
POSTED IN christmas decorations, holiday decorations, room decor


POLL
There's a maaajor thunderstorm outside, but you can be found:

LOVE THIS
🌸 QUIZ! Plan your perfect spring picnic 🌸

The flowers? Blooming. Your al fresco hangout? Totally ready to get plotted (inspired by our current read, The Second Favorite Daughter's Club: Sister Sabotage). Click HERE to take the quiz!
FREE STUFF