become a contributor


MAKE IT CUTE
DIYs
ADORABLE DIY TOTES 4 TWEENS
 A lot of DIY books are more, well, crappy than crafty. From convoluted instructions to super-lame projects, you may end up spending your cold hard cash on the creative equivalent of your grandma's bathroom tissue cozie. (What? You never realized she hid the t.p. under that crocheted froggy?)
Sew Hip is different. Shannon Mullen's totally rad tome is filled with easy-to-make bags, pillows, and more cute creations similar to those sold in trendy boutiques. Best of all, Sew Hip gives you a springboard for adding your own personal twist.
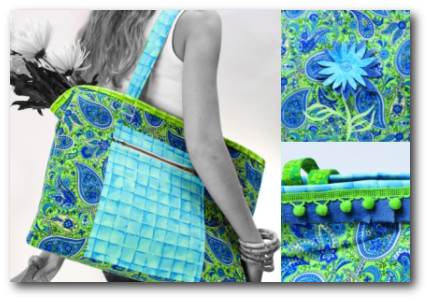
One of our fave projects in the book is this lime-and-blueberry Jazzy ToteMAKE IT U! (seen below) that she designed especially for tweens and teens. But you can also start with a plain or patterened tote from a craft store, thrift shop, or a cheap-chic place like Target—then embellish it following Shannon's main mantra:
Here are a few ideas for doing just that!
Idea #1: POP ART. Using original or clip art (make sure to respect copyright of all materials) trace your design of choice onto one side of a Steam-a-Seam sheet -- that's a fusible web of glue that adheres two parts of your sewing project together. Or personalize the tote with your initials. (Click here for free monogram templates!) Tres preppy-chic!
Once you've traced your designs, rough cut around them and peel off the paper side of the Steam-a-Seam that you did not draw on. Place this new sticky side to the wrong side of your fabric, and iron in place. Cut out your design. Peel away the second Steam-a-Seam paper side, and place sticky side to the wrong side of your fabric again. Fuse, using steam, and cut out your design. This will give you a 3-D design, like the flower shown on this Jazzy Tote!
Idea #2: HAVE A BALL! Ball Fringe is back, baby. Select a straight stitch and move your need to the left needle position. Most machines use the stitch width to do this. Snap on your zipper foot and butt the left edge of the zipper foot up to the balled edge of the fringe. Your fringe should lie wherever you would like it to. Stitch it into place! We loved the way this vintage fringe sets off this amazing paisley design from the So You, Sew Fun fabric line by RJR fabrics!
MORE IDEAS: For more of Shannon's suggestions (think denim details, zany zigzags and stellar stitches) check out the book. Click here for where-to-buy info!
Got crafty ideas of your own?
{Share 'em on the boards!}


POLL
This is NOT a drill: <em>Tortured Poets Department</em> is out! The first track you fell in love with was...

LOVE THIS
Say hello to our 2024 Beauty Awards Winners 💄

We’re presenting our beauty MVPs of this year so your face card... and hair card...and mani card...never, ever declines again. Check out our must-haves HERE!
FREE STUFF
THE OFFICIAL GIRLBOSS MANUAL
If you’re already on that summer internship application grind, consider this your secret to success. Learn the best tips and tricks from real female CEOs and entrepreneurs—then get ready to build your boldest future. Enter to win here!