become a contributor


MAKE IT CUTE
DIYs
Turn Your Gum Wrappers Into Gems

Photos by Tory Nymick
Jonesin' for some new jewelry but don't have any more moolah? No worries. This fun craft is completely free and fun to make. Plus, you're recycling all those old gum wrappers. Saving the environment, your wallet and your style all at the same time? We love.
What you'll need:
Small candy wrappers (at least 22, more if you have a bigger wrist) gum wrappers or Starburst wrappers work well.
2 pieces of string for the end, as long as you want
What you'll do:
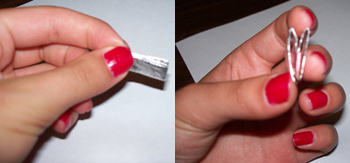
First you have to fold each individual wrapper.
1. Start by folding the wrapper into thirds, “hot dog style”, or long-ways.
2. Then fold it in half, the same way.
3. Now fold it so the two ends meet and make a crease in the middle. Then unfold it.
4. Take one end and fold it halfway so the end is in the center crease. Do this with the other end, too.
5. Now fold it where you had made the original crease so it looks like a V. Make sure the ends of the wrapper are on the inside of the V.
6. Fold each wrapper following steps 1-5 and then start to link them together.
The tricky part is putting it together, but once you understand it, it’s easy to get the hang of.
Now, put them all together...
1. First pick up one wrapper and look at one side. If you can see a bunch of pieces of paper inside the V, turn it around so you can see the other side. You should see two pieces on each “wing” of the V. This side is always the side you want to face up.
2. Take two wrappers and hold one vertical in one hand, so it looks like a V. Hold the other one by the crease, horizontally.
3. Push the horizontal V into the slots of the vertical V, one piece of paper per slot. Push it until the creases meet, and make sure they are connected at the base, not where the paper is apart. You have made your first link!
4. Now, make the V you just attached is the vertical one for the next step. Take a new wrapper and attach it the same way, but make sure the side with only two pieces of paper is facing up, or you will have trouble putting the next link in. When you have three, you should begin to see the zigzag pattern you will get.
5. Keep connecting them using steps 1-3 until you get the length you want. If you mess up, it’s easy to just take it out and try again or fold a new wrapper.
6. When you have the length you want, you could end the bracelet a lot of diff ways, but the easiest is to just get pieces of string and thread them through the ends. You have to make sure that both ends of the bracelet are diagonally up so you can thread the string through the crease. You don’t need to tie it, it should stay there on its own. Tie it around your wrist and you are done!
-Tory
Nymick


POLL
This is NOT a drill: <em>Tortured Poets Department</em> is out! The first track you fell in love with was...

LOVE THIS
All your period probs, solved 💕

So maybe your monthly flow isn’t, um, go with the flow. Never fear! Take our quiz to pair up with your perfect Pamprin and end the menstrual madness.
FREE STUFF