become a contributor


STYLE
Beauty
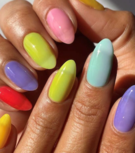
Indulge in your own at-home manicure!
With salons suspended, your nails are likely in serious need of some pampering—so why not give it to them? Whether your nail beds are brittle, chipped, or just colorless, there's an at-home solution for you.
Sure, you don't need to give yourself the ultimate glam mani for the time being, but providing your tips with a little TLC can actually enhance your confidence and keep you energized amid life in quarantine. Follow this guide to completing your own at-home manicure to boost your indoor beauty game.
Soaking off gels and nail extensions
To remove gels and nail extensions on your own, purchase a small bottle of acetone (available on Amazon). "Acetone typically removes all soft gels, dip powders, acrylic nails, and other soak-off extensions," explains Victoria Wreen Bah, founder of Nailed by Victoria, a 24-hour mobile nail service company in New York City. Apply acetone to cotton balls, place them on your fingertips, and wrap them tightly in alumnium foil for 20-30 minutes. "You can also use a glass or metal bowl that acetone won't melt if you don't have foil and cotton," Bah recommends. "Whichever method you adopt, you should see the product become gummy before it completely dissipates." Manhattan nail salon Glosslab is even releasing a Gel Eraser Kit in May to ease at-home removal, featuring a gel eraser, a nail file, bamboo cuticle pushers, and remover wipes, all products that technicians use to remove polish in-store.
Nail strengthening and maintenance
Before moving straight to polish, it's important to cut and file your nails to keep them in top shape. "Using a clipper or file, reduce them to about fingertip length," suggests Rachel Apfel Glass, founder and CEO of Glosslab. "This is super important for hygiene so that germs and bacteria don't get stuck underneath the nails." Glosslab's new Nail Tool Kit includes all the essentials for shaping your nail beds: a nail clipper, a nail file, a cuticle pusher, scissors, and tweezers. In taming cuticles, Bah encourages you to proceed with caution: "Always push cuticles back, and refrain from clipping into the skin or irritating the fingers." If your nails feel extra weak, try soaking them in warm oils such as tea tree oil, coconut oil, argan oil and castor oil. "When nails aren't moisturized, they'll become brittle and less flexible," Bah asserts. "This acts as a hot oil treatment that keeps nails strong."
The polishing/drying process
Prior to applying any color, be sure to use a base coat to keep nails looking healthy and shiny. Glosslab's Mani Rescue Kit includes polish for every step of the process: a sticky base coat, Clearly Pink Polish, Glitter Polish, a quick-dry top coat, a nail file, and remover wipes for touch-ups. Apply two to three coats of color before the top coat, ensuring that the pigment is uniform throughout the entire nail. Once you're finished polishing, leave at least 15 to 20 minutes of drying time so that you don't smudge. "Quick-dry drops and nail-drying sprays are super helpful," Bah recommends. "If you don't have either of those, though, there's a little trick. After a few minutes, when the polish has set a bit, put your hands in cold water, as cold as you can stand, and your nails will dry. It's an old-school tactic that existed before the fancy sprays!" A DIY smudge-free manicure? *Nailed* it.
Are you going to try an at-home manicure? Let us know in the comments!
Slider image via Instagram


POLL
Choose the best braided hairstyle:

LOVE THIS
🌸 QUIZ! Plan your perfect spring picnic 🌸

The flowers? Blooming. Your al fresco hangout? Totally ready to get plotted (inspired by our current read, The Second Favorite Daughter's Club: Sister Sabotage). Click HERE to take the quiz!
FREE STUFF
Win! Happy + Healthy Essentials serum

Clear breakouts and tighten pores with Healthy + Happy Essentials. Enter to win here!